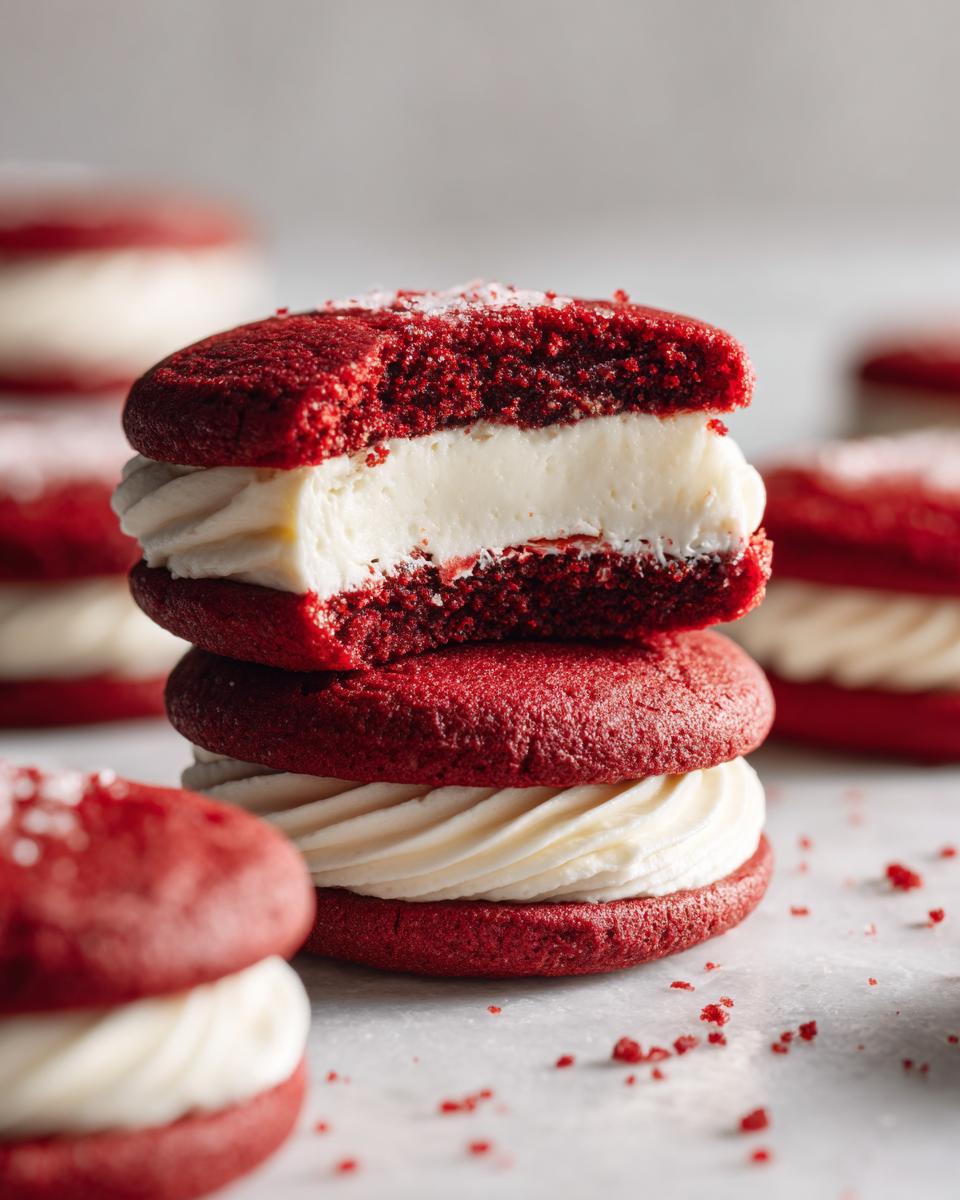
Oh, red velvet! It’s one of those flavors that just screams celebration, right? And let me tell you, turning that classic, gorgeous red into a chewy cookie? Absolute genius! These Red Velvet Cookies are seriously a dream come true. I remember the first time I tried making them – I was aiming for something festive for my neighbor’s holiday party, and they were a HUGE hit. The way the slightly cakey, slightly chewy cookie just melts in your mouth, with that hint of cocoa and that zingy cream cheese frosting? It’s pure magic in every bite. Trust me, they’re surprisingly easy to whip up, and the color alone is just stunning.

Why You’ll Love These Red Velvet Cookies
Honestly, these cookies are a total winner for so many reasons:
- Super Easy to Make: Even if you’re new to baking, you can totally nail these! The dough comes together fast, which is always a win in my book.
- That Classic Red Velvet Flavor: You get all that wonderful, slightly chocolatey goodness that red velvet is known for.
- Perfect Texture Trio: They’ve got those delightfully chewy centers, just slightly crisp edges, and that decadent cream cheese frosting. Seriously, the best combo!
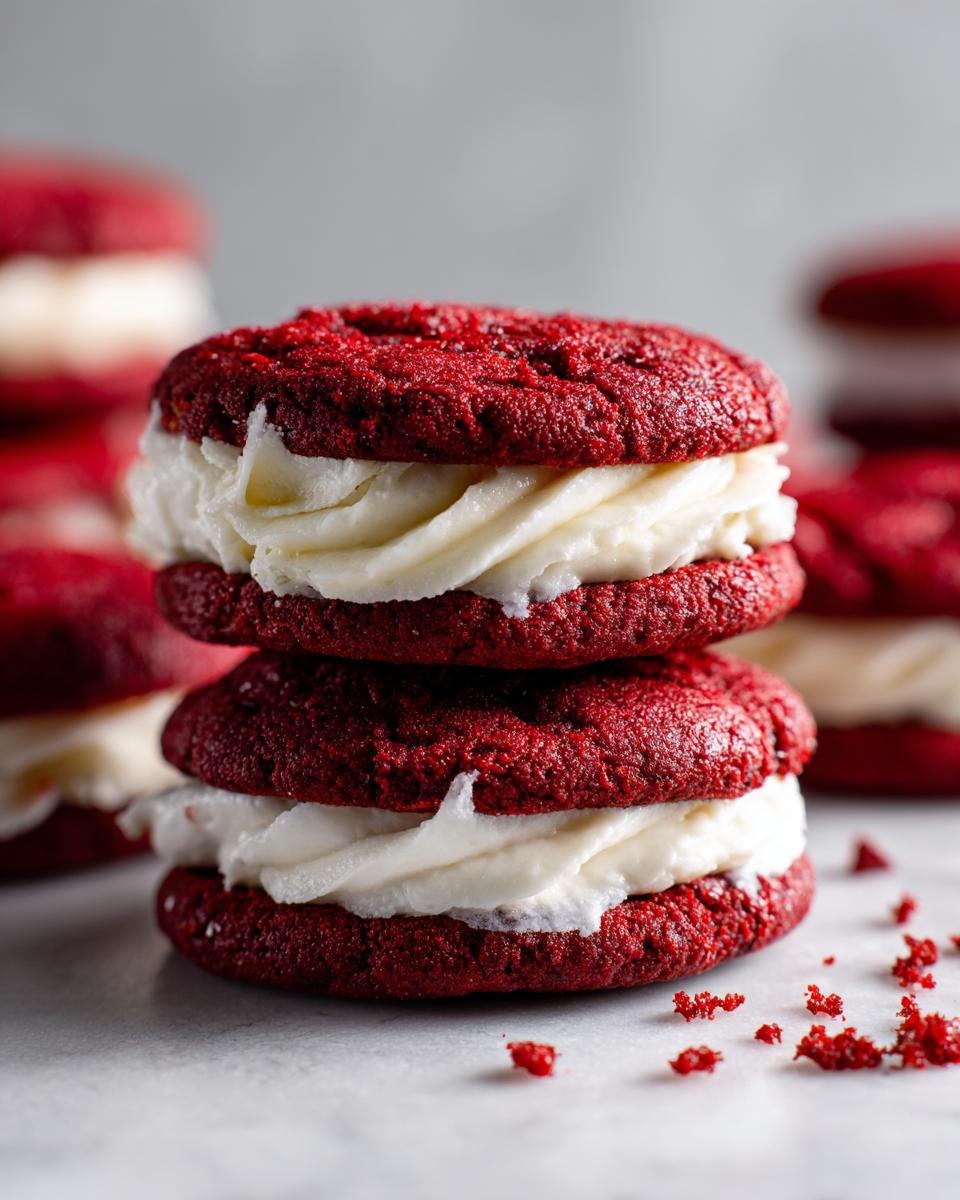
- Visually Stunning: The vibrant red color is just gorgeous! They’ll seriously wow your guests and make any cookie platter pop.
- Holiday Ready: They scream holiday cheer, but they’re also just as perfect for birthdays, Valentine’s Day, or any time you need a little extra sparkle.
- Quick to Bake: We’re talking minimal kitchen time for maximum cookie enjoyment. Perfect for when you need a sweet treat ASAP!
Gather Your Ingredients for Red Velvet Cookies
Alright, let’s get our kitchen prepped! Building these amazing red velvet cookies starts with having all your bits and bobs at the ready. You’ll want to grab your two and a quarter cups of all-purpose flour, one teaspoon of baking soda, and half a teaspoon of salt to give them a little lift. And of course, the star of the show – half a cup of unsalted butter that’s been sitting out long enough to be nice and soft. Don’t forget your one cup of granulated sugar for sweetness! We’ll also need a large egg, one teaspoon of pure vanilla extract for that warm aroma, and just one tablespoon of unsweetened cocoa powder to whisper that chocolatey flavor. And for that iconic red hue? One to two drops of red food coloring – trust me, just a little bit does the trick! These are the building blocks for cookie perfection.
Crafting Perfect Red Velvet Cookies: Step-by-Step
Okay, getting these cookies made is where the real fun begins! It’s a pretty straightforward process, and I’ve learned a few little tricks along the way to make sure they turn out just right, every single time. Remember, the key is not to rush and to keep an eye on things – baking is kind of like a little science experiment, but way more delicious! So grab your apron, and let’s get these gorgeous red velvet cookies into creation. You’ll find it’s super rewarding, especially when you see that beautiful red color develop right before your eyes. It’s almost like magic, and it makes me think of these other simple Christmas cookies or even those cute Christmas tree cupcakes!
Preparing the Cookie Dough
First things first, let’s get that dough ready! You’re going to start by creaming together your softened butter and sugar in a big bowl. I like to use an electric mixer for this because it really gets it nice and fluffy, almost like whipped honey. Then, crack in your egg and whisk in that teaspoon of vanilla extract until it’s all nicely combined. Now for the signature red velvet magic: stir in that tablespoon of unsweetened cocoa powder and your red food coloring. You want to mix it until the dough is this gorgeous, uniform red color. Be careful not to go overboard with the food coloring – a little goes a long way, though an extra drop never hurt anyone if you want it super vibrant! Once that’s mixed, it’s time to add your dry ingredients – your flour, baking soda, and salt. Gently mix them in until *just* combined. Seriously, don’t overmix here; we want tender cookies, not tough ones!
Baking Your Red Velvet Cookies
Alright, dough ready – time to bake! Preheat your oven to 350°F (that’s 175°C) and get your baking sheets lined with parchment paper. Parchment paper is a lifesaver, trust me. Now, spoon out rounded tablespoons of your dough onto the prepared sheets. I like to leave a good couple of inches between them because they do spread out a bit. Pop them into the oven for about 9 to 11 minutes. You’re looking for the edges to be set but the centers to still look a little soft… they’ll firm up as they cool! Once they’re out, let them hang out on the baking sheets for a few minutes before carefully moving them to a wire rack to cool completely. Patience here is key to avoiding crumbled cookies!
Cream Cheese Frosting for Your Red Velvet Cookies
Okay, no red velvet cookie is complete without that dreamy cream cheese frosting, right? It’s the perfect tangy counterpoint to the sweet, chewy cookie. Making it is super simple! You just need half a cup of softened cream cheese – make sure it’s not cold, or it’ll get lumpy! – and about a quarter cup of powdered sugar. I just pop those into a small bowl and beat them together until they’re super smooth and creamy. Sometimes I add a tiny splash of vanilla extract too, but honestly, it’s delicious as is. This frosting is the perfect addition, just like the one on my classic Red Velvet Cake!
Assembling the Ultimate Red Velvet Cookies
Now for the really fun part – bringing these beauties together! Once your red velvet cookies are totally cool (and trust me, they *must* be cool, or that frosting will melt into a puddle!), grab your cream cheese frosting. You can either spread a nice generous dollop onto the flat side of one cookie using a butter knife or, if you’re feeling fancy, pipe it on with a pastry bag. Then, gently place another cookie on top, flat side down. Press just a little so the frosting peeks out perfectly around the edges. It looks so professional and tastes even better!

Tips for Perfectly Chewy Red Velvet Cookies
You know, getting that perfect chewy texture in cookies can sometimes feel like a bit of a puzzle, but with these red velvet ones, it’s totally achievable! My biggest secret? Don’t overthink it, but do pay attention to a few key things. First off, make sure your butter and egg are at room temperature. Cold ingredients just don’t cream together as well, and that’s crucial for getting that nice fluffy base. Also, when you add the dry ingredients, mix *just* until they disappear. Seriously, a few streaks of flour left are better than overmixing, which makes cookies tough instead of chewy. I learned this the hard way when I once made a batch of cinnamon rolls that ended up way too dense because I overmixed the dough! And for these cookies, remember they’ll keep baking a little on the hot pan. Pulling them out when the centers still look *slightly* soft is the golden ticket to chewy perfection. It’s kinda like making peppermint bark; you want firm, but not hard!
Variations and Add-ins for Your Red Velvet Cookies
While these cookies are absolutely divine just as they are, I love playing around with them a little to make them even more special! If you’re feeling adventurous, think about tossing in about half a cup of mini chocolate chips right at the end when you’re mixing in the dry ingredients. They add these delightful little pockets of gooey chocolate that are just heavenly with the red velvet flavor. Or, if you’re baking for a special occasion, a sprinkle of festive food-safe glitter or colorful nonpareils right on top of the frosted cookies can make them look super festive. You could even try adding a touch of almond extract along with the vanilla for a slightly different nutty note, kind of like in those easy Christmas cookies!
Storage and Make-Ahead Tips for Red Velvet Cookies
Alright, so you’ve made these glorious red velvet cookies, and you want them to stay delicious, right? Easy peasy! For the frosted cookies, you’ll want to store them in an airtight container in the fridge. The cream cheese frosting loves a little chill, and this keeps them nice and fresh for about 3-4 days. If you’re just talking about unfrosted cookies, they’ll stay chewy at room temperature in a sealed container for just as long. And guess what? You can totally make the dough ahead of time! Just wrap it up tight and pop it in the fridge for up to 2 days, or freeze it in balls for longer storage. Just let them thaw a bit before baking!
Frequently Asked Questions About Red Velvet Cookies
Got questions? I’ve got answers! Making these red velvet cookies is usually pretty straightforward, but sometimes little things pop up. Here are a few things people often ask, and these might remind you of getting ready for Christmas morning or even starting your holiday planning!
Can I make these red velvet cookies without food coloring?
You can try, but it won’t really be *red* velvet then, will it? The food coloring is what gives them that signature vibrant color. If you’re really trying to avoid it, you could use a tiny bit of beet powder for color, though it might slightly affect the taste and texture. Honestly, though, a little bit of red food coloring goes a long way in making these cookies special!
Why are my red velvet cookies flat?
Oh, that happens sometimes! Usually, it’s because the butter was too soft when you creamed it with the sugar, or maybe you overmixed the dough after adding the flour. Overmixing develops the gluten too much, making them spread. Another reason could be your baking soda is old and lost its oomph! Try making sure your butter is just softened (you can press into it easily, but it’s not greasy) and mix your dough gently. Sometimes I even pop my dough in the fridge for 15-20 minutes before baking if my kitchen is super warm!
How long do red velvet cookies last?
These frosted cookies are best kept in an airtight container in the fridge. That way, they’ll stay yummy for about 3 to 4 days. If they’re unfrosted, they can hang out at room temperature in a sealed container for a similar amount of time. They’re usually gone pretty quickly in my house anyway!
Can I add chocolate chips to this red velvet cookie recipe?
Absolutely! I love to do this! Just fold in about half a cup to a full cup of mini chocolate chips or even chunks into the dough right after you’ve mixed in the dry ingredients. They add such a delicious extra layer of flavor and texture that complements the red velvet and cream cheese frosting perfectly. It’s like having two favorite treats in one!
Estimated Nutritional Information
Just a heads-up, these numbers are just estimates, ya know? Because everyone’s pantry is a little different! But generally, you’re looking at around 180 calories per cookie. They’ve got about 9 grams of fat, 23 grams of carbs, and around 18 grams of sugar, with just a touch of protein. I’m listing out the main bits below, but remember these can change a bit depending on the brands you use and how generous you are with that frosting!
Print
Red Velvet Cookies
- Total Time: 30 min
- Yield: 24 cookies
- Diet: Vegetarian
Description
Chewy red velvet cookies with a cream cheese frosting.
Ingredients
- 2 1/4 cups all-purpose flour
- 1 teaspoon baking soda
- 1/2 teaspoon salt
- 1/2 cup unsalted butter, softened
- 1 cup granulated sugar
- 1 large egg
- 1 teaspoon vanilla extract
- 1 tablespoon unsweetened cocoa powder
- 1-2 drops red food coloring
- 1/2 cup cream cheese, softened
- 1/4 cup powdered sugar
Instructions
- Preheat your oven to 350°F (175°C). Line baking sheets with parchment paper.
- In a medium bowl, whisk together the flour, baking soda, and salt.
- In a large bowl, cream together the softened butter and granulated sugar until light and fluffy.
- Beat in the egg and vanilla extract until well combined.
- Stir in the cocoa powder and red food coloring until the dough is uniformly red.
- Gradually add the dry ingredients to the wet ingredients, mixing until just combined. Do not overmix.
- Drop rounded tablespoons of dough onto the prepared baking sheets, about 2 inches apart.
- Bake for 9-11 minutes, or until the edges are set and the centers are still slightly soft.
- Let the cookies cool on the baking sheets for a few minutes before transferring them to a wire rack to cool completely.
- While the cookies cool, prepare the cream cheese frosting: In a small bowl, beat together the softened cream cheese and powdered sugar until smooth.
- Once the cookies are completely cool, spread or pipe the cream cheese frosting onto the bottom of one cookie and top with another.
Notes
- For a stronger red color, you can add another drop of food coloring.
- You can add chocolate chips to the dough for extra flavor.
- Store frosted cookies in an airtight container in the refrigerator.
- Prep Time: 20 min
- Cook Time: 10 min
- Category: Dessert
- Method: Baking
- Cuisine: American