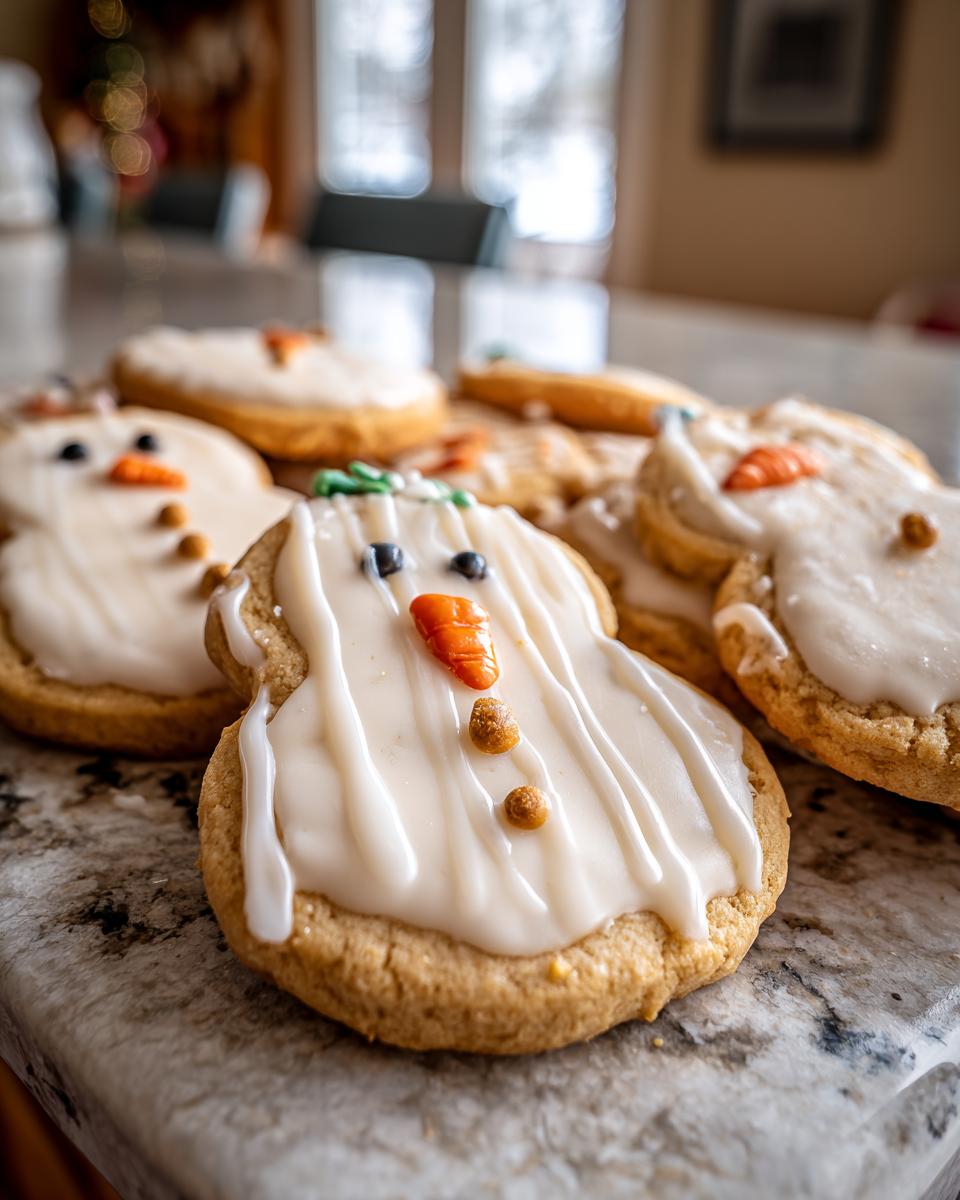
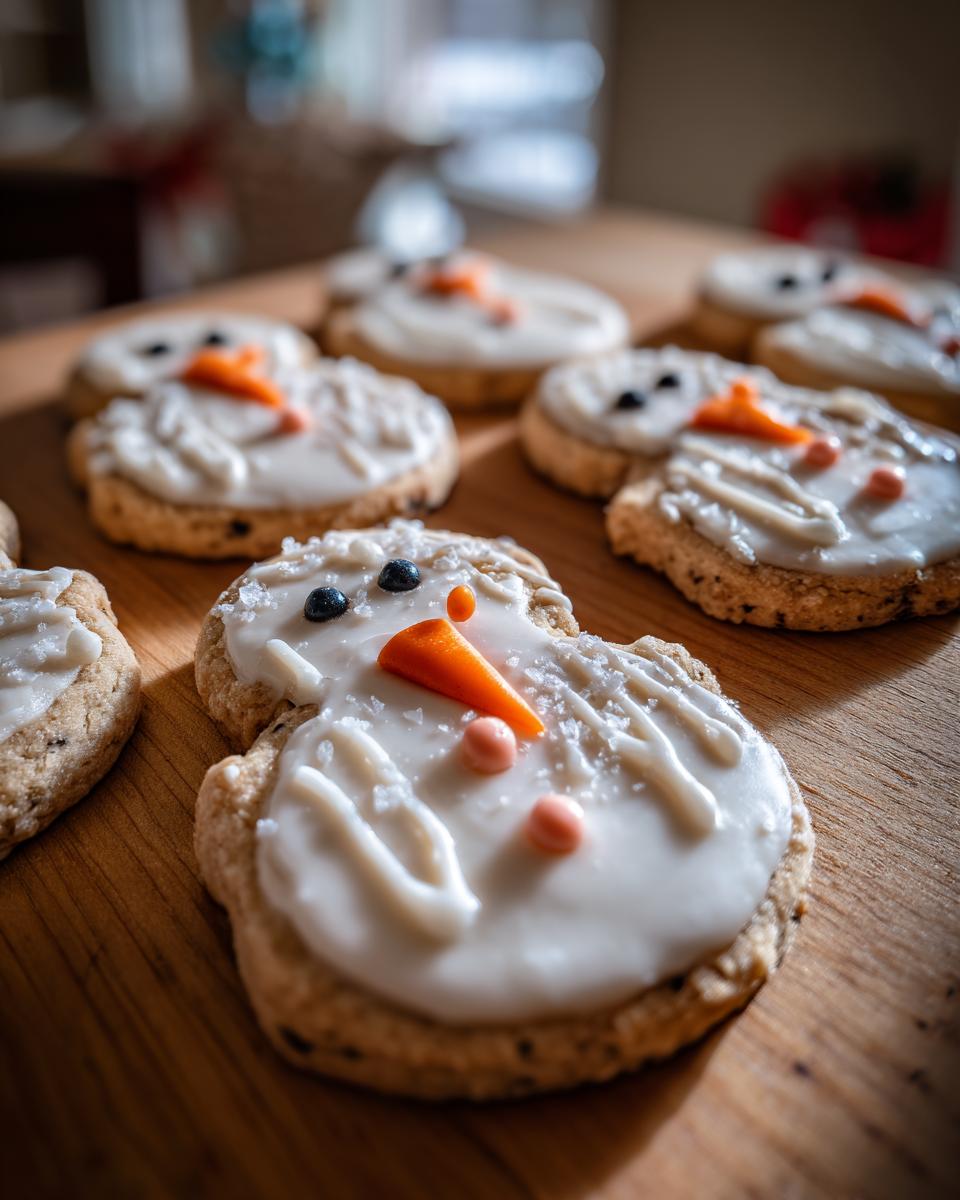
There’s just something magical about holiday baking, isn’t there? The smell of cinnamon and sugar filling the kitchen, the happy chaos of little hands helping out – it’s the best! And when it comes to festive treats, these Melted Snowman Sugar Cookies are an absolute winner. Seriously, they’re so much fun to make and even more fun to eat! My kids absolutely went wild for them last year, and honestly, I have to admit, I snuck a few myself. They’re not just cute with their lopsided, melty look; they taste like a classic sugar cookie should – buttery, sweet, and just perfect. Get ready to spread some holiday cheer, one adorable cookie at a time!
Why You’ll Love These Melted Snowman Sugar Cookies
Seriously, these cookies are a holiday baking slam dunk! Here’s why:
- So easy to make: Even if you’re a beginner baker, you can totally nail these!
- Kid-friendly fun: Perfect for getting the little ones involved in the kitchen – they’ll LOVE decorating!
- Festive and whimsical: They look absolutely adorable and totally capture that silly, melted snowman vibe.
- Deliciously classic: At their heart, they’re a fantastic, buttery sugar cookie that everyone will devour.
Gather Your Ingredients for Melted Snowman Sugar Cookies
Alright, let’s get down to business! To whip up these adorable Melted Snowman Sugar Cookies, you’ll need a few staples from your pantry. Make sure your butter is nice and soft – I usually leave it on the counter for about an hour before I start. You’ll also need some good old granulated sugar for the cookie dough and powdered sugar for that dreamy icing. Grab your flour, baking powder, a pinch of salt, a splash of vanilla, and a couple of large eggs. For the darling decorations, I always keep a stash of M&Ms, mini chocolate chips, and maybe some licorice laces. Trust me, having everything ready to go makes the whole process so much smoother!
Essential Equipment for Baking Melted Snowman Sugar Cookies
Before you dive in, let’s chat about what you’ll need! Making these Melted Snowman Sugar Cookies is super easy if you have the right tools. You’ll want a couple of baking sheets (line ’em with parchment paper for zero sticking!), a trusty mixer (handheld or stand – either works great!), some mixing bowls, spatulas, measuring cups and spoons, and of course, cookie sheets. Don’t forget a rolling pin and your favorite snowman-shaped cookie cutter. Oh, and if you’re thinking about fun ways to track Santa’s progress, you might want to check out this DIY Christmas Advent Calendar guide too!
Step-by-Step Guide to Making Melted Snowman Sugar Cookies
Okay, this is where the magic really happens! Don’t worry, it’s way less complicated than it looks. Think of it more like a fun afternoon craft project that ends with delicious treats. So, let’s get these little guys ready to melt! Looking for more super easy holiday baking ideas? You’ve gotta try these Easy 3-Ingredient Christmas Cookies or these yummy Holiday Sugar Cookie Bars with Sprinkles!
Preparing the Cookie Dough
First things first, get that oven preheated to 350°F (175°C) and line a couple of baking sheets with parchment paper. In a medium bowl, just whisk together your flour, baking powder, and salt. Now, in a big bowl, cream your softened butter and sugar together until it gets nice and fluffy – this is key for a tender cookie! Beat in those eggs one by one, then give it a stir of vanilla extract. Gradually add your dry stuff to the wet stuff, mixing until it all just comes together. Don’t overmix! Then, split the dough in half, wrap each piece up, and pop ’em in the fridge for at least 30 minutes. They need a little chill-out time!
Shaping and Baking Your Melted Snowman Sugar Cookies
Once the dough is nice and firm, grab one half and roll it out on a lightly floured surface to about a quarter-inch thickness. Use your snowman cookie cutter to get those shapes out, placing them on your prepared baking sheets. Give them a little space because they do spread a tiny bit. Bake them for about 8 to 10 minutes. You’re looking for the edges to just start getting a little golden. Let them cool on the baking sheet for a few minutes before carefully moving them to a wire rack to cool off completely. Patience here is key – decorating warm cookies is a messy disaster!
Creating the Perfect Icing
While your cookies are cooling, let’s whip up the icing. It’s super simple! Just grab a medium bowl and whisk together the powdered sugar with a splash of milk. You want it smooth and pourable, but not too thin! It should drizzle nicely down the sides. If it’s too thick, add a tiny bit more milk; if it’s too thin, add a little more powdered sugar. Easy peasy!
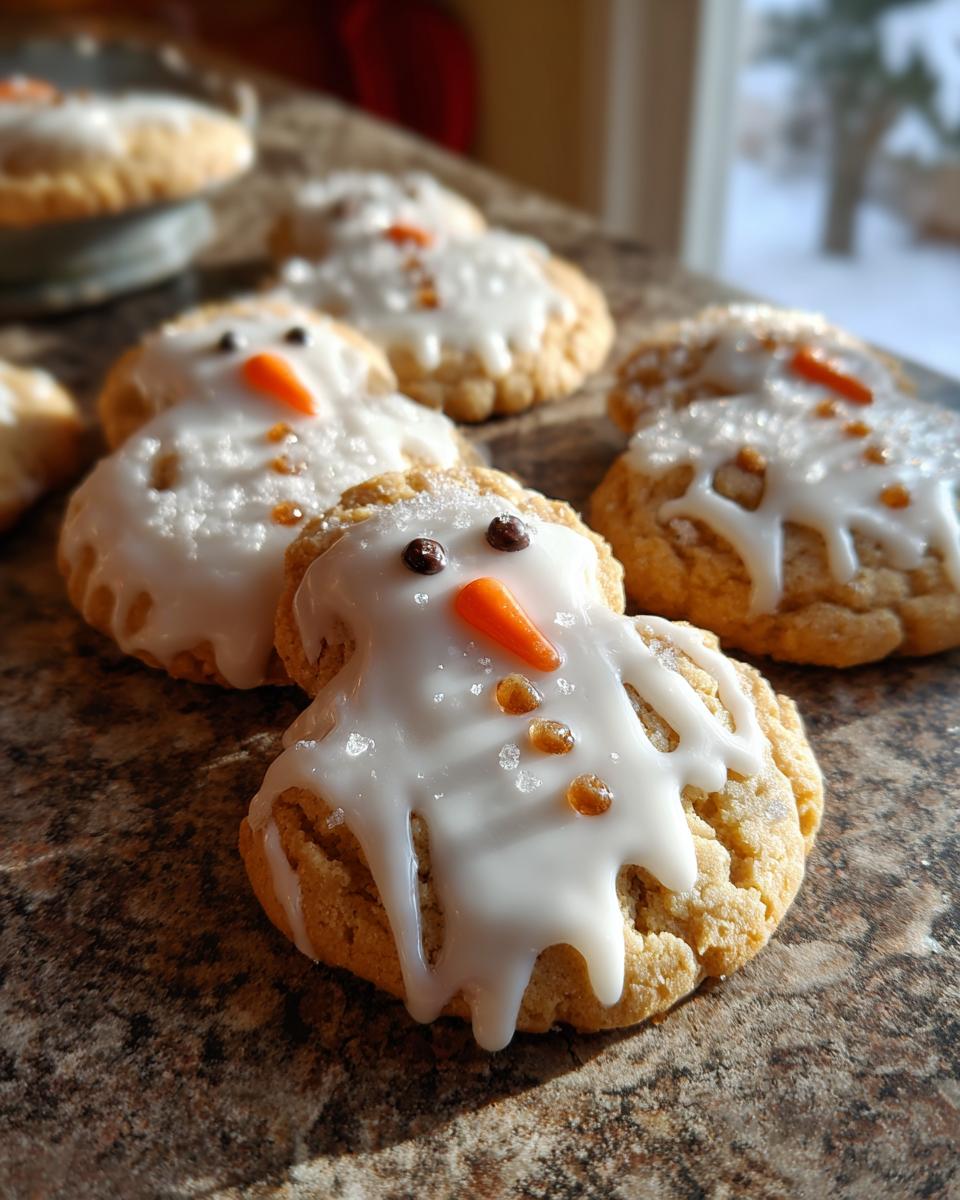
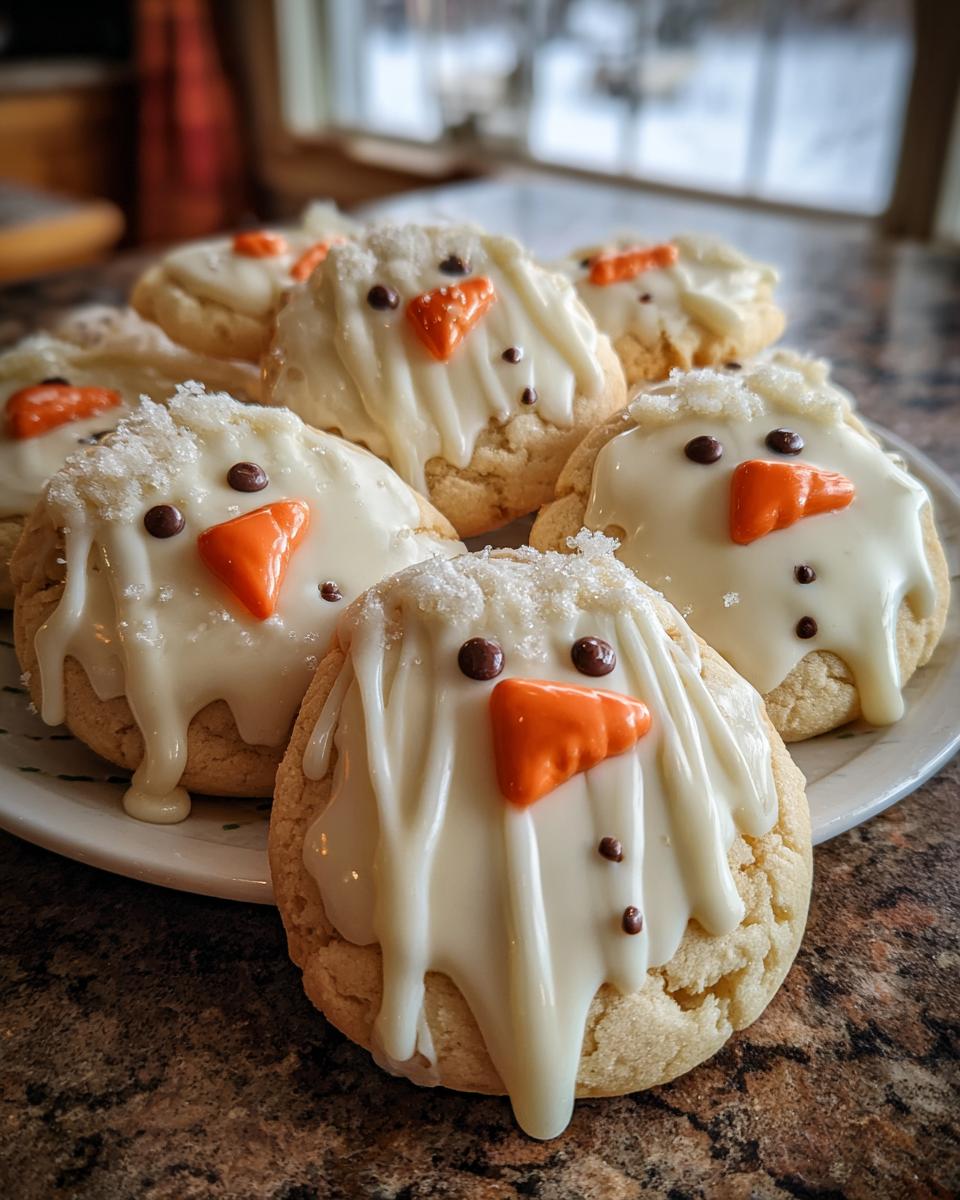
Decorating Your Melted Snowmen
This is the BEST part! Once your cookies are totally cool – and I mean *completely* cool – it’s time to get creative. Drizzle that icing all over the top of each snowman cookie. Don’t be afraid if it’s a little uneven; that’s what makes them look perfectly melted and a little bit silly! Before that icing sets, quickly press your candies into place. Use a couple of M&Ms or mini chocolate chips for the eyes and nose, maybe another for a mouth, and two more for buttons. And for arms? Those licorice laces are perfect for sticking out the sides! You can even use a little piece of licorice for a hat if you’re feeling fancy. Want more fun DIY ideas for the holidays? Check out these DIY Salt Dough Ornaments!
Tips for Perfect Melted Snowman Sugar Cookies
Okay, so you want those Melted Snowman Sugar Cookies to turn out absolutely perfect? Trust me, a few little tricks go a long way! Don’t stress if your dough feels a bit sticky; just give it that 30 minutes in the fridge – it makes all the difference for rolling and cutting. When you’re baking, keep an eye on them; those 8-10 minutes can go by fast, and you don’t want them golden-brown, just lightly golden. For the decorating, make sure those cookies are totally cool! If they’re even a little warm, your icing will slide right off. And don’t be afraid of a little imperfection; that’s what makes them look so charmingly melted and unique. For more great holiday ideas, check out these Christmas Morning Traditions You’ll Love!
Ingredient Notes and Substitutions
A few little notes to make sure your Melted Snowman Sugar Cookies turn out just right! Softened butter is super important here – it creams up with the sugar way better than cold butter, giving you that perfect tender cookie texture. If you need dairy-free, you can totally use a good quality vegan butter stick. For vegetarian needs, this recipe is already perfect! If you’re out of baking powder, a quick fix is to use double the amount of baking soda, but make sure you have an acid like cream of tartar to activate it. Honestly though, the recipe is pretty straightforward with basic pantry staples!
Storing Your Festive Melted Snowman Sugar Cookies
Once all that decorating is done, you’ll want to keep your adorable Melted Snowman Sugar Cookies looking their best! The easiest way is to store them in an airtight container. If you stack them, just pop a little parchment paper between the layers to keep the icing from smudging. They’re perfectly happy sitting on the counter at room temperature for a good few days. Honestly, they usually disappear way before they have a chance to get stale!
Frequently Asked Questions About Melted Snowman Sugar Cookies
Got some burning questions about these fun Melted Snowman Sugar Cookies? I’ve got you covered! Let’s clear things up so your baking goes off without a hitch.
Can I make these cookies ahead of time?
Absolutely! These Melted Snowman Sugar Cookies are fantastic for making ahead. You can bake the cookies a day or two in advance and store them in an airtight container. Decorate them the day you plan to serve them, or up to a day before. The icing holds up well!
What kind of cookie cutter works best?
For these Melted Snowman Sugar Cookies, a standard snowman-shaped cookie cutter works wonders! You know, the kind with a rounded bottom and maybe a little hat on top. Just make sure it’s got a decent depth so you get a good shape. If you don’t have a specific snowman cutter, you can also use a round cookie cutter and then sort of sculpt the dough into a snowman shape before baking. Get creative!
How long do these cookies stay fresh?
Stored in an airtight container at room temperature, your beautifully decorated Melted Snowman Sugar Cookies should stay fresh and delicious for about 3-4 days. Honestly though, they usually disappear much faster than that in my house! They might lose a tiny bit of their crispness after day three, but they’re still super yummy.
My icing is too runny – what should I do?
Oops, running icing is a common little hiccup! Don’t worry, it’s an easy fix. Just whisk in a little more powdered sugar, about a tablespoon at a time, until it reaches a thicker, more drizzly consistency. You want it thick enough to stay put on the cookie but thin enough to spread easily. You can also try adding a tiny bit more milk if it’s too thick.
For more fantastic holiday breakfast ideas, you should definitely take a peek at my Christmas Morning Cinnamon Rolls!
Estimated Nutritional Information
Just a heads-up, these numbers are estimates! The exact calories, fat, carbs, and protein in your Melted Snowman Sugar Cookies can change a bit depending on the brands you use and how much icing and candy you load onto each one. But generally, one cookie comes in around 180 calories with about 8g of fat and 25g of carbs. Happy baking!
Print
Melted Snowman Sugar Cookies
- Total Time: 40 min
- Yield: 24 cookies
- Diet: Vegetarian
Description
Fun and festive sugar cookies shaped like melting snowmen, perfect for holiday baking.
Ingredients
- 3 cups all-purpose flour
- 1 teaspoon baking powder
- 1/2 teaspoon salt
- 1 cup (2 sticks) unsalted butter, softened
- 1 1/2 cups granulated sugar
- 2 large eggs
- 1 teaspoon vanilla extract
- 1/2 cup powdered sugar
- 1/4 cup milk
- Assorted candies for decoration (e.g., M&Ms, mini chocolate chips, licorice laces)
Instructions
- Preheat your oven to 350°F (175°C). Line baking sheets with parchment paper.
- In a medium bowl, whisk together the flour, baking powder, and salt.
- In a large bowl, cream together the softened butter and granulated sugar until light and fluffy.
- Beat in the eggs one at a time, then stir in the vanilla extract.
- Gradually add the dry ingredients to the wet ingredients, mixing until just combined.
- Divide the dough in half, wrap each half in plastic wrap, and chill for at least 30 minutes.
- On a lightly floured surface, roll out one half of the dough to about 1/4-inch thickness. Cut out snowman shapes using a cookie cutter. Place the cutouts on the prepared baking sheets.
- Bake for 8-10 minutes, or until the edges are lightly golden. Let the cookies cool on the baking sheets for a few minutes before transferring them to a wire rack to cool completely.
- While the cookies are cooling, prepare the icing. In a medium bowl, whisk together the powdered sugar and milk until smooth and pourable. Add more milk or powdered sugar as needed to reach your desired consistency.
- Once the cookies are completely cool, you can decorate them. Drizzle the icing over the top of each snowman cookie to create the “melted” effect.
- Before the icing sets, use assorted candies to create the snowman’s face, buttons, and arms.
Notes
- You can use different colored icings for a more festive look.
- Store decorated cookies in an airtight container at room temperature.
- Prep Time: 30 min
- Cook Time: 10 min
- Category: Dessert
- Method: Baking
- Cuisine: American